Sizzling Secrets: The Art of Dry Aging Meat at Home
Elevate your culinary game with the transformative power of dry aging meat. This time-honored technique, once reserved for high-end steakhouses, is now making its way into home kitchens. Discover how to unlock intense flavors, tender textures, and gourmet-quality cuts right in your own refrigerator. From selecting the perfect cut to mastering the aging process, we'll guide you through this gastronomic adventure that's sure to impress even the most discerning palates.

The ideal conditions for dry aging include a temperature range of 34-38°F (1-3°C) and humidity levels between 80-85%. These parameters create an environment where enzymatic breakdown occurs without bacterial growth. As the meat ages, it loses up to 30% of its initial weight due to moisture loss, resulting in a more concentrated flavor. The outer layer of the meat dries out and forms a protective crust, which is trimmed off before cooking, revealing the prized aged meat beneath.
Choosing the Right Cut for Home Dry Aging
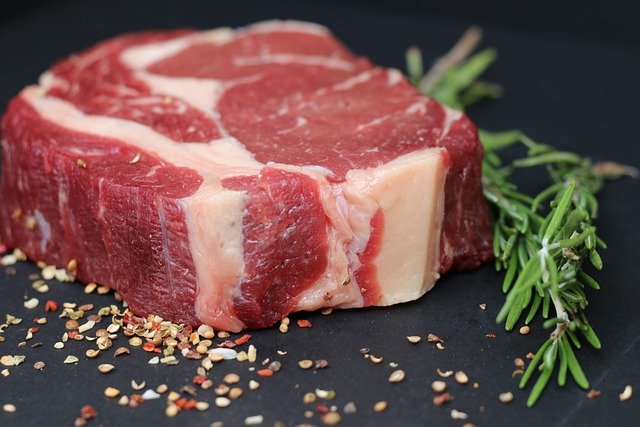
Not all cuts of meat are suitable for dry aging at home. The best choices are large, well-marbled cuts with a protective fat cap. Prime rib roasts, ribeye steaks, and New York strip loins are excellent options for beginners. These cuts have enough fat content to withstand the aging process without becoming too dry or developing off-flavors. It’s essential to source high-quality, fresh meat from a reputable butcher to ensure the best results.
When selecting your meat, look for cuts that weigh at least 5-7 pounds. Larger cuts are better suited for dry aging as they have a higher meat-to-surface ratio, which helps minimize moisture loss. Avoid pre-cut steaks or meats with excessive trimming, as these are more prone to spoilage during the aging process. Remember, the quality of your starting product will significantly impact the final result, so don’t hesitate to invest in premium cuts for your dry aging experiment.
Setting Up Your Home Dry Aging Station
Creating a proper dry aging environment at home is crucial for success and food safety. While professional dry aging rooms use specialized equipment, you can achieve great results with some simple modifications to your refrigerator. Start by dedicating a separate mini-fridge or a rarely-used section of your main refrigerator for dry aging. This will prevent cross-contamination and odor transfer to other foods.
To control humidity, place a small fan inside the refrigerator to promote air circulation. You can also use a tray of salt or a humidity control device to maintain optimal moisture levels. Line a wire rack with cheesecloth and place it on a baking sheet to catch any drips. Position your meat on the rack, ensuring all sides are exposed to air. Monitor the temperature and humidity regularly using a thermometer and hygrometer to maintain ideal conditions throughout the aging process.
The Dry Aging Timeline: From Fresh to Fabulous
The duration of dry aging can vary depending on personal preference and desired flavor intensity. Most home dry aging projects range from 14 to 45 days, with noticeable changes occurring at different stages. During the first week, enzymatic activity begins to tenderize the meat, but flavor changes are minimal. By day 14, you’ll start to detect a more pronounced beefy flavor and improved tenderness.
As you approach the 21-30 day mark, the meat develops a deeper, nuttier flavor profile with hints of blue cheese. For those seeking an even more intense experience, aging beyond 30 days can result in bold, almost funky flavors reminiscent of aged cheeses. Keep in mind that longer aging periods also mean greater moisture loss and the need to trim more of the outer crust, resulting in less usable meat. Experiment with different durations to find your perfect balance of flavor and texture.
Preparing and Cooking Your Dry Aged Masterpiece
After the aging process is complete, it’s time to reap the rewards of your patience. Begin by carefully trimming away the dried outer layer and any discolored areas. This step is crucial for removing any potentially harmful bacteria and revealing the beautifully aged meat beneath. Don’t be alarmed by the dark color or strong aroma of the trimmed portions – this is normal and indicates a successful aging process.
When cooking dry aged meat, less is more. The concentrated flavors and tender texture shine best with simple preparations. Season generously with salt and pepper, then sear over high heat to develop a flavorful crust. Finish cooking to your desired doneness in the oven or on a cooler part of the grill. Allow the meat to rest for at least 10 minutes before slicing to ensure optimal juiciness. Serve your dry aged creation with minimal accompaniments to truly appreciate its complex flavors and buttery texture.
Pro Tips for Perfect Dry Aging
• Always use food-safe gloves when handling raw meat to prevent contamination.
• Rotate your meat every few days to ensure even air circulation and prevent moisture buildup.
• Keep a log of your dry aging experiments, noting durations, temperatures, and flavor outcomes.
• Start with shorter aging periods (14-21 days) before attempting longer durations.
• Clean your dry aging setup thoroughly between batches to maintain food safety.
• Consider investing in a UVC sanitizing light to help control bacterial growth in your aging environment.
• Experiment with different cuts and grades of beef to discover your personal preferences.
• Share your dry aged creations with friends and family for a truly memorable dining experience.
In conclusion, dry aging meat at home is a rewarding culinary adventure that allows you to create restaurant-quality steaks in your own kitchen. With the right setup, patience, and attention to detail, you can unlock a world of intense flavors and tender textures that will elevate your meat-eating experience. As you master this technique, you’ll gain a deeper appreciation for the art of meat preparation and the incredible transformations that occur during the aging process. So, roll up your sleeves, select your perfect cut, and embark on your dry aging journey – your taste buds will thank you.


